I love the fresh and spiky taste of Gazpacho. I serve them in shot glasses for canapes which make for a great addition at any party.
Gazpacho
Breadcrumbs made from 1 medium slice bread (I make mine from sundried tomato bread but white bread will work fine)
2 Sweet Red Peppers
1 Cucumber
4 large Tomatoes
1 clove Garlic
Juice of 1/2 Lemon
4 tbsp Extra Virgin Olive Oil
2 tsp Red Wine Vinegar
2 tsp Balsamic Vinegar
1/2 Red Onion
Tabasco - a few drops more if you want it really spicy
Seasoning
Fresh Basil (finely chopped)
Deseed and roughly chop the 1 and half of the peppers and half the cucumber.
Place this and the remaining mixture except for the Basil in a blender and pulse until smooth and liquefied. Pass this mixture though a sieve retaining the juice, push the mixture through the sieve as much as you can to get all the juice. Add the breadcrumbs to the liquid, blend again to get the breadcrumbs and juice as smooth as possible.
Season to taste and add in the fresh Basil.
Put the gazpacho in the fridge for at least a couple of hours. When you are ready to serve, finely chop the remaining cucumber and pepper half. Pour the gazpacho into the serving glasses (they look great in martini glasses or shot glasses for a canape sized serving). Sprinkle a couple of the pepper and cucumber pieces on top of the gazpacho, drizzle a little more olive oil over the top and serve.
Apetito Buena!

26 July 2010
Tomato Tarte Tatin (A Sensory Addiction)
I think I am more addicted to the smell which comes off the Tomato vine when picking them than in the actual eating (although that is rather lovely too).
So in preparation for the glorious Tomato picking activity which is due to start any time now, here is a simply scrumptious Tomato Tarte Tatin recipe which is great for supper with a salad and will undoubtedly please both carnivores and vegetarians alike. The addition of Basil at the end gives it an added freshness to the sweet and tarty filling.
So... when you've finished sniffing your Tomato vines, try this one out.
Tomato Tarte Tatin (serves 6 for supper)
1 pack of Puff Pastry
 6 large Vine Tomatoes
1 Leek (thinly sliced)
1 Red Onion (thinly sliced)
1 tbsp Balsamic Vinegar
1 tbsp Red Wine
2 tbsp Caster Sugar
Drizzle of Olive Oil
25g Butter
Sprig of fresh Thyme
Small handful of fresh Basil
Small tub of Creme Fraiche
Egg wash
Handful of toasted Pine Nuts
If you have a tarte tatin dish then use it but otherwise any non-stick cake tin (without a removable bottom) will work just fine.
In a frying pan over a low heat gently fry the leaks and red onion in the olive oil and butter until turning translucent. Add the sugar, red wine and vinegar and a sprinkling of thyme and cook over a low heat to caramelise, this will take around 15 minutes (stir occasionally to ensure they do not stick or burn). Season to taste.
Slice the tomatoes horizontally (they look beautiful cut this way as you can see the whole structure of the tomato). Coat the tomatoes in the caramelised juice and then place face up so they cover the base of the tatin dish. Spoon over the leek and onion mixture including all the juices so it covers the tomatoes and any gaps. Place in the oven at 180 degrees for 20 minutes. During this time the onion mixture and tomatoes will caramelise some more. When you remove the mixture from the oven there needs to be almost no liquid left in the tin otherwise the tarte may be abit soggy when finished. Leave to cool in the fridge.
Roll out the Puff Pastry to the right size and lay over the top of the tatin dish. Cut the pastry around the dish and push the edge down around the inside edge of the dish. Egg wash the pastry and then bake in an oven at 190 degress for 25-30 minutes until puffed up and golden.
Run a knife around the edge of the pastry and place a flat plate or serving platter over the top of the tatin dish. Take a safe hold on the plate and tatin dish and invert them so the plate is now on the bottom. Remove the tatin dish and sprinkle with fresh Basil and toasted Pine Nuts.
Serve with a spoonful of Creme Fraiche and maybe a Parmesan and Rocket Salad.
This dish is great both hot and cold and if you want it more substantial goats cheese compliments it well.
P.S. I know that the addition of leeks and onions deviates somewhat from the traditional tarte tatin but the tomatoes are still the main event!
24 July 2010
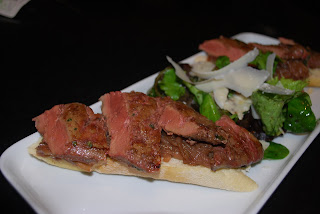
Calves Liver & Caramelised Onion Bruscetta
With only a few weeks to go before leaving the kitchen on an expedition to find sun, relaxation and new food ideas (aka holiday), it is the time for the annual ritual of eating healthily. This is performed in the vain hope that my body will realise it really can lose all those pounds in just a short time in order to replicate a more bardo-esque stature when in reduced clothing.
However I am nothing if not a realist and believe that fasting or eating plain cabbage for any period at all is really not a thing that makes me or anyone else around me happy. My thoughts on dieting therefore rely on a reduction of the lovely creamy, melt in your mouth substance that is Chocolate, more alcohol free nights, more exercise and more of the leafy green stuff.
The newspapers have recently informed us that to lose weight we should eat less red meat. They may be right but the problem is I just love meat (actually I love all foods). Calves Liver is one of my favourites and now that I understand it does not need to be cooked to within a milli-second of turning into a grainy substance and served up in gravy as per my childhood, it is even more tempting. So when in the butchers farm shop last week it jumped up and down behind the counter lovingly calling me by name, it would have been plain rude of me to resist. However, I am so disciplined in my ritual that I did do something a little different (including the green leafy stuff) and to my delight it was quite simply delectable.
So here it is, my heaven on a plate...
Rocket and Parmesan Salad
2 handfuls of Rocket Leaves
Bruscetta
1 Ciabatta Loaf
Olive Oil (drizzle)
1 clove Garlic
Slice the ciabatta to suit your own taste, we recommend 2 per person.
Rub the ciabatta with the garlic clove and drizzle a little olive oil on a baking sheet place the ciabatta slices on the sheet and drizzle a little more oil over the top. Bake in a moderate oven for 5-8 minutes until lightly toasted. Remove from the oven and leave to cool. Any spare of these will last a few days in an airtight container.
Red Onion Marmalade
25g Butter
1 tbsp Olive Oil
3 large Red Onions (thinly sliced)
1 tbsp Sugar (we use caster but you could use granulated)
1 tbsp Balsamic Vinegar
1 tbsp Red Wine Vinegar
Seasoning
Melt the butter and a little olive oil in a saucepan, add the onions and cook until they become slightly translucent. As they begin to brown, add in the sugar, both vinegars and seasoning. Cook on a low heat for 15-20 minutes until nicely caramelised, soft and the liquid has almost evaporised. Remove from the heat and put a lid on to keep warm.
Calves Liver
2 large slices of Calves Liver (ask your butcher to slice them thinly)
Plain Flour (for dusting)
Knob of Butter
Drizzle of Olive Oil
A few Sage leaves (thinly sliced)
Dust the calves liver in the flour and shake off excess. Heat the butter and a drizzle of olive oil in a large flat bottomed pan and add the sage leaves. When very hot add the calves liver and cook around 2 minutes each side (no more, remember it is thin and best when pink). Remove from the pan and set aside to rest.
Without cleaning the pan, pour in the dressing and gently heat through. Pour over the rocket leaves and toss in the parmesan cheese.
To assemble the dish, place the bruscetta on a plate, top with caramelised onions, then the calves liver and top with dressed rocket and parmesan shavings.
(You will probably have some onion marmalade left over. Use it in a sandwich with blue cheese, in goats cheese and onions tarts, Croque Monsieur with added onion marmalade, the options are limitless).
However I am nothing if not a realist and believe that fasting or eating plain cabbage for any period at all is really not a thing that makes me or anyone else around me happy. My thoughts on dieting therefore rely on a reduction of the lovely creamy, melt in your mouth substance that is Chocolate, more alcohol free nights, more exercise and more of the leafy green stuff.
The newspapers have recently informed us that to lose weight we should eat less red meat. They may be right but the problem is I just love meat (actually I love all foods). Calves Liver is one of my favourites and now that I understand it does not need to be cooked to within a milli-second of turning into a grainy substance and served up in gravy as per my childhood, it is even more tempting. So when in the butchers farm shop last week it jumped up and down behind the counter lovingly calling me by name, it would have been plain rude of me to resist. However, I am so disciplined in my ritual that I did do something a little different (including the green leafy stuff) and to my delight it was quite simply delectable.
So here it is, my heaven on a plate...

Rocket and Parmesan Salad
2 handfuls of Rocket Leaves
Drizzle of Extra Virgin Olive Oil
Drizzle of Balsamic
1 tsp Red Currant Jelly
1 clove Garlic
Parmesan shavings (quantity to taste)
Drizzle of Balsamic
1 tsp Red Currant Jelly
1 clove Garlic
Parmesan shavings (quantity to taste)
Finely chop the garlic and mix with the olive oil, balsamic and red currant jelly (put them all in a jar together and shake to combine is the quickest and easiest way, you can also leave any remaining in the fridge to use over the next couple of days). Set aside.
Bruscetta
1 Ciabatta Loaf
Olive Oil (drizzle)
1 clove Garlic
Slice the ciabatta to suit your own taste, we recommend 2 per person.
Rub the ciabatta with the garlic clove and drizzle a little olive oil on a baking sheet place the ciabatta slices on the sheet and drizzle a little more oil over the top. Bake in a moderate oven for 5-8 minutes until lightly toasted. Remove from the oven and leave to cool. Any spare of these will last a few days in an airtight container.
Red Onion Marmalade
25g Butter
1 tbsp Olive Oil
3 large Red Onions (thinly sliced)
1 tbsp Sugar (we use caster but you could use granulated)
1 tbsp Balsamic Vinegar
1 tbsp Red Wine Vinegar
Seasoning
Melt the butter and a little olive oil in a saucepan, add the onions and cook until they become slightly translucent. As they begin to brown, add in the sugar, both vinegars and seasoning. Cook on a low heat for 15-20 minutes until nicely caramelised, soft and the liquid has almost evaporised. Remove from the heat and put a lid on to keep warm.
Calves Liver
2 large slices of Calves Liver (ask your butcher to slice them thinly)
Plain Flour (for dusting)
Knob of Butter
Drizzle of Olive Oil
A few Sage leaves (thinly sliced)
Dust the calves liver in the flour and shake off excess. Heat the butter and a drizzle of olive oil in a large flat bottomed pan and add the sage leaves. When very hot add the calves liver and cook around 2 minutes each side (no more, remember it is thin and best when pink). Remove from the pan and set aside to rest.
Without cleaning the pan, pour in the dressing and gently heat through. Pour over the rocket leaves and toss in the parmesan cheese.
To assemble the dish, place the bruscetta on a plate, top with caramelised onions, then the calves liver and top with dressed rocket and parmesan shavings.
(You will probably have some onion marmalade left over. Use it in a sandwich with blue cheese, in goats cheese and onions tarts, Croque Monsieur with added onion marmalade, the options are limitless).
Stilton Millefeuille with Pear and Vanilla Butter
I am not sure I have come across any dish which initially raises as many eyebrows but subsequently turns most people into a quivering wreck complete with drooling mouth syndrome (yes it really is that good).
A love of blue cheese and a glut of pears from the orchard made me search for ideas on putting together these gorgeous ingredients but in a different way. This recipe is an adaptation of another dish I tried while on holiday. The Pear and Vanilla Butter came from a friend's very old Jam and Preserves book and has been adapted accordingly. I make these as starters, cheese course and canapés so your options are endless.
Once you tried it I can recommend the Pear and Vanilla Butter on Toast in the morning, evening and midnight munchies, the Stilton Mousse with just about anything (especially fresh Figs) and if you don't want to use Puff Pastry, try it with the Ricotta and Parmesan Biscuits. Put them all together and you will be out to impress!
Pear and Vanilla Butter (makes approximately 2 medium jars)
2lbs Pears
Juice of 3 Lemons
1/2 Pt Water
1 Vanilla Pod (split)
1.5lbs Sugar (warmed)
Place the pears, water, lemon juice and vanilla in a saucepan, cover and bring to the boil. Once boiled turn down to a simmer for 10 minutes.
Uncover and cook for a further 15 to 20 minutes until the pears are very soft.
Remove the vanilla pod, scrape the seeds out and add these to the mixture. (Do not throw away the vanilla pod, wash it, dry it and put it in your sugar container for baking with - gives the sugar a lovely vanilla aroma and taste).
Empty the pear mixture into a liquidiser and blend to a puree. Sieve the puree into a measuring jug discarding any bits remaining in the sieve.
For every pint of puree add 10oz of warmed sugar. Empty back into the saucepan and stir over a medium heat until the sugar has dissolved. Bring to the boil for approximately 15 minutes until the butter has reached the consistency of a thick puree.
Empty into sterilized jars, seal and leave for 2 days before eating.
Stilton Millefeuille (makes approximately 20 canapés)
1 pack Puff Pastry (life really is to short to make this)
Egg Wash
250g Stilton Cheese (we like Colston Basset)
150g Mascarpone Cheese
197ml Creme Fraiche
First of all make the millefeuille. Roll out the puff pastry and cut into 1" x 2" rectangles. Brush with egg wash and score the top in a criss cross pattern. Cook for 10-12 minutes at 190 degrees until golden in colour.
For the stilton mousse, using a food processor (or by hand if you'd rather) combine the stilton, mascarpone and creme fraiche together until it becomes the consistency of a smooth mousse (be careful not to overmix as the mascarpone can become quite loose).
To assemble the canape, cut the pastries in half horizontally and spread a little of the butter on the bottom, top with another pastry, pipe the stilton mousse onto the top and finish with another layer of pastry.
If you want to decorate the plate, scatter a few caramelised walnuts around the plates or top the millefeuille with a walnut.
Lovely Lemon Capers!
The great thing about doing something that you love is that is rarely becomes a chore, always makes demands on your creative side and never really feels like work in the traditional sense. Hard work, yes! But strangely (and sometimes masochistically after 18 hours) gratifying. So enough of my ‘look at me’ self gratification, it’s another day and another menu banging at my kitchen door awaiting my obsessive indulgence.
Having come from a place where wastage was not an immediate concern – I am ashamed to admit this was probably due to a lack of respect - I have suddenly found myself challenging the weekly ritual of emptying the fridge of out-of-date foodstuffs (those ‘must haves’ which seemed like a good idea when walking around the supermarket) or throwing out leftovers I felt sure "would come in handy for tomorrows dinner" and which I spent precious time packaging up into one of the thousand plastic containers which seem to multiply on their own and take up residence in the largest cupboard in the kitchen.
Tonight I find myself looking at a menu which involves yesterdays mash potato and a longing for capers (one of the side effects of working in food are an ever changing craving for using different ingredients, I think actually it is the subconscious testing my creative abilities).
The inspiration for the Lemon Caper Dressing came from a holiday in Jamaica (it was served with Breaded Veal Escalope and was in jeopardy of becoming my staple diet while I was there - it was so good). On returning home to England I did what any recipe obsessed individual would do and I recreated it. Since then the accompanying options have been limitless and always gorgeous.
Salmon and Prawn Fishcakes with Lemon Caper Dressing (serves 4)

Salmon and Prawn Fishcakes
200g Salmon Fillet
200g King Prawns
150g Mash Potatoes
1 Egg Yolk
1 dsp chopped Flat Leaf Parsley
1 dsp chopped Dill
Zest of 1 Lemon
4 tbsp Plain Flour
2 eggs (whisked with a little water)
Seasoning
Plain Flour and Breadcrumbs for coating
200g King Prawns
150g Mash Potatoes
1 Egg Yolk
1 dsp chopped Flat Leaf Parsley
1 dsp chopped Dill
Zest of 1 Lemon
4 tbsp Plain Flour
2 eggs (whisked with a little water)
Seasoning
Plain Flour and Breadcrumbs for coating
Lemon Caper Dressing
Olive Oil
1 Shallot (finely chopped)
Juice of one Lemon
100g Unsalted Butter (straight from the fridge)
4 dsp Capers
Seasoning
1 Shallot (finely chopped)
Juice of one Lemon
100g Unsalted Butter (straight from the fridge)
4 dsp Capers
Seasoning
This recipe is so quick, simple yet delicious it barely warrants instructions.
Roughly chop the salmon and prawns together and mix with the mash potato, zest, egg yolk, dill, coriander and seasoning until combined. Don’t over mix as the chunkiness is good for texture in the fishcake.
Put the egg wash, flour and breadcrumbs in to different bowls. Take dessert spoonfuls of the fish mixture and shape into balls (you can make them traditional fishcake shape if you want but I think they look a bit different this way). Roll them in the egg, then the flour and finally the breadcrumbs. Place onto a baking tray and when all the fishcakes have been prepared place the tray in the fridge for 30 minutes. This helps the crumb to set on the fishcake and reduces loss when cooking.
Heat the olive oil in a large flat frying pan and add the fish cakes a few at a time cooking until golden all over – just jiggle the pan around to ensure the fish cake is browned all over. When all the cakes have been fried place them in the oven on a low heat (120 ish degrees) to keep warm while you make the dressing.
Wipe out the frying pan and pour in 2 tablespoons of Olive Oil with the shallot until softened and translucent. Add the juice of 1 Lemon and the capers, cook for a couple of minutes. Whisk in the butter, cubed and taken directly from the fridge, (it should be cold when you add it so it acts as both an ingredient and also a thickener in the dressing). When melted and combined, season the sauce being careful with the addition of Salt as the Capers are salty to begin with.
Serve dressing with fishcakes and do what any self respecting foodie does... simply indulge!
Subscribe to:
Posts (Atom)